In 2009 and 2010 I had the opportunity to study with natural dye master Michel Garcia. He is a marvelous and knowledgeable teacher, fascinated with using the chemistry of simple ingredients to create natural colors. One of the things that he demonstrated to us was to be fearless about the indigo fermentation vat. What a gift! For me, the indigo fermentation vat has always been a mystery and I could never quite figure out all the details so I never pursued it. I was getting great and consistent color with my lye and soda ash and chemical reducing agents, so why bother?
I’m telling you it is worth the bother. It’s worth it because it’s fast and easy and gives great results. If you’ve ever wanted an alternative and easy vat, try this recipe.
Michel’s technique, which is based on the traditional indigo vats of Morocco, India and Provence, relies on the chemical reactions between a mineral alkali and a natural reducing agent to remove excess oxygen (a chemical process called reduction) , which liberates the indigo dye molecule, allowing it to attach to fibers and bond. These natural reducing agents include dried and fresh fruits, minerals, and flavanoids. There are countless variations on this vat: Jim Liles publishes both a lime-zinc and an iron (copperas) indigo vat recipe and recipes using sugar, yeast and other common ingredients are available online.
Rather than get all tangled up in these various recipes, Michel gave us a recipe called the 1-2-3 vat, which I’ve renamed the Organic Indigo Sugar Vat. Give it a try and see the marvelous color that develops!
My thanks to Diane de Sousa and Donna Brown for providing additional information to the scrawled notes from my classes with Michel.
How much indigo to use?
25 grams (about an ounce or 2 Tablespoons) of powdered indigo will make a vat that will dye about 1 kg (2.2lbs) of fiber a light to medium shade of blue.
50 grams (about 2 ounces or 4 Tablespoons) of powdered indigo will make a vat that will dye about 1 kg (2.2lbs) of fiber a medium-dark shade of blue.
100 grams (about 4 ounces or 8 Tablespoons) or powdered indigo will make a vat that will dye about 1 kg (2.2lbs) of fiber a dark blue, and there will be enough indigo left in this vat to dye other items a slightly lighter shade, too. Please note that you will need a larger jar or container to make a solution that contains 100 grams of indigo
Michel Garcia’s Easy Organic Sugar Vat (1-2-3 Vat)
Note: All of these ingredients may be purchased at Botanical Colors. You may also obtain calcium hydroxide from some building supply stores or Hispanic markets (in the spice section and called “Cal”). Fructose crystals are available at health food stores.
- 1 part powdered natural indigo
- 2 parts calcium hydroxide, also known as pickling lime, cal, calx
- 3 parts fructose crystals
- Dust mask and gloves. Calcium hydroxide dust can be irritating.
Create your stock in a large 2 quart Mason jar or a sturdy plastic container. A jar is nice so you can see the reaction take place. You will be adding hot water, so make sure the plastic is heat resistant. We made our stock with 50 grams (approx. 2 ounces) of indigo in a 2 quart Mason jar. If you are making anything larger than that, you’ll need a larger container to mix the stock and can use a gallon jar or plastic bucket.
Wet out the natural indigo with a little warm water to form a paste. Add about 2 cups of hot water (120°F or 50°C) and stir. The solution will be dark blue and a bit gritty.
Wearing the dust mask, carefully and gradually add the calcium hydroxide and stir well so that the calcium hydroxide is incorporated into the mixture. Work out any lumps but try not to beat it so much that you add a lot of air into the solution. If the mixture becomes very thick or stiff, add more very hot water to thin out the mixture and return it to a liquid state. If the mixture is still too thick, divide it into another container and add hot water until it is thin.
Add the fructose crystals and stir well. Then add hot water until the jar is full or the container is mostly full.
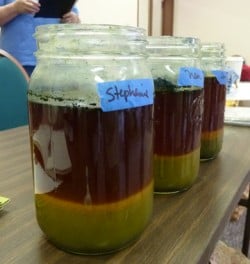
The solution should now look greenish yellow and somewhat murky. Let this settle for an hour. The chemical reaction will work more quickly if the solution is warm, so you can place the glass jar in a pot of hot water. Stir the solution every 15-20 minutes and let it settle. Observe the stock and you can see the liquid near the top is getting clearer and yellow-green – don’t worry if it turns brownish red, that’s okay too. After 45-60 minutes have elapsed, give the stock a final stir and let it settle for 15 minutes. Some dyers recommend leaving the stock overnight, others use it after an hour. We tried it both ways and didn’t really notice a difference. The stock is ready to use if it has the characteristics described below.
How to tell if it’s ready
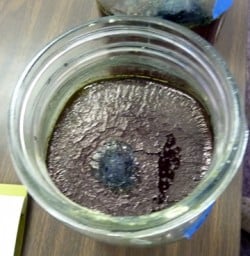
There’s a nice dark blue indigo flower on the top of the jar of solution and a layer of coppery scum as well
- There’s a clear demarcation between the liquid in the vat and the layer of sludge below
The color is a yellowish green (it will look somewhat opaque – different than the startling clearness of a chemical vat). Note that depending on your indigo, you might also see a brown colored stock, which is what happened in our class. It still worked beautifully.
Preparing the Indigo Vat
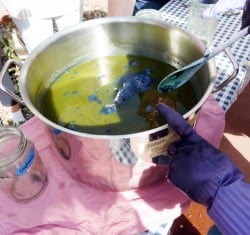
Fill a non-reactive dye pot or a sturdy plastic bucket about 2/3 full with hot water – approximately 120F. Carefully stir and tip in the contents of the stock solution including the sludge at the bottom. Stir gently and allow the vat to come to a yellow-green color (this takes between 15-30 minutes).
Prepare Yarn or Fabric
All fibers should be thoroughly soaked (wetted out) in lukewarm water prior to dipping.
- This vat is nearly ready. Note the yellowish olive green color and the dark blue “flower” on the vat.
When you see that the vat has become yellowish-green and there’s a blue flower and some coppery scum on top, the vat is balanced and ready for dipping. Dip your wetted out skein, fiber or fabric into the vat and keep it submerged for 30 seconds to 3 minutes. Carefully remove the fiber, letting the excess liquid drain into a drip bucket that will be returned to the vat. You will begin to see the fibers turn from murky green to teal to blue. This is the magic.
Allow the fiber to turn blue with no teal or yellowish areas. Let the fiber air for at least 30 minutes, opening up skeins if the yarn strands are stuck together or unfolding corners of fabric.
Continue dipping until the fiber is two shades deeper than what you want. As the fiber is rinsed and dried, some of the excess indigo is washed away and the fiber turns out lighter than what you see coming out of the vat. If you are attempting to match an indigo shade from a swatch, dampen the swatch for a more accurate match.
The Drip Bucket
Since indigo is precious, you can return the collected indigo liquid to the vat. Plan on doing this when you take a break from dipping or need to replenish the vat.
Rebalancing the Vat
The vat will need rebalancing when the dye liquid turns blue. At this time, add a generous spoonful of fructose crystals. Wait 15-30 minutes for the vat to return to a yellow-green state. If it remains blue, add a level spoonful of calcium hydroxide, stir and wait. You may need to repeat this process for the vat to reduce.
Replenishing the Vat
The vat may be replenished with additional stock solution if you make a new batch and add it to the existing vat.
Storing the Vat
You may keep the vat by transfering it to a 5 gallon bucket with a lid. Label it and use it within 6 months. You will need to rebalance it the next time you use it by adding additional fructose and calcium hydroxide.
Disposing of the Vat
Modify the vat’s pH by adding 1/2 cup of white household vinegar and disposing the cold vat down the drain.
Happy Dipping!


