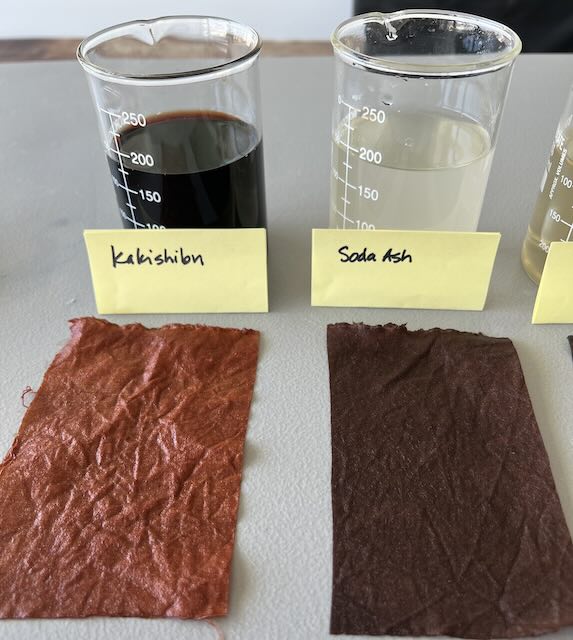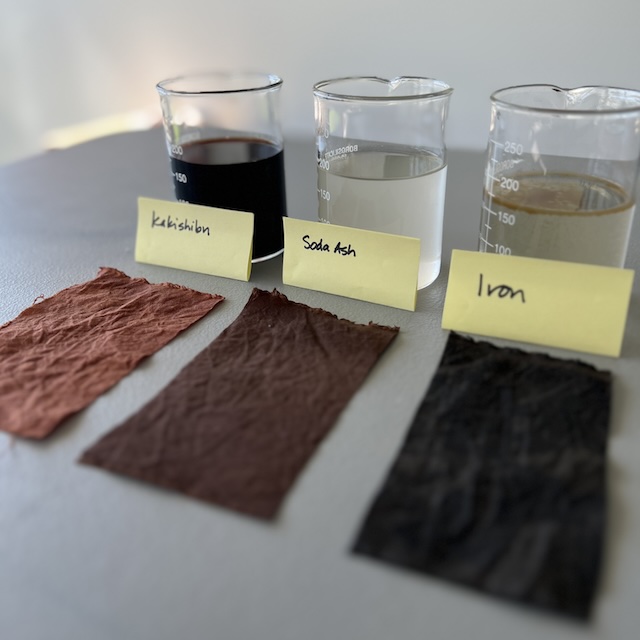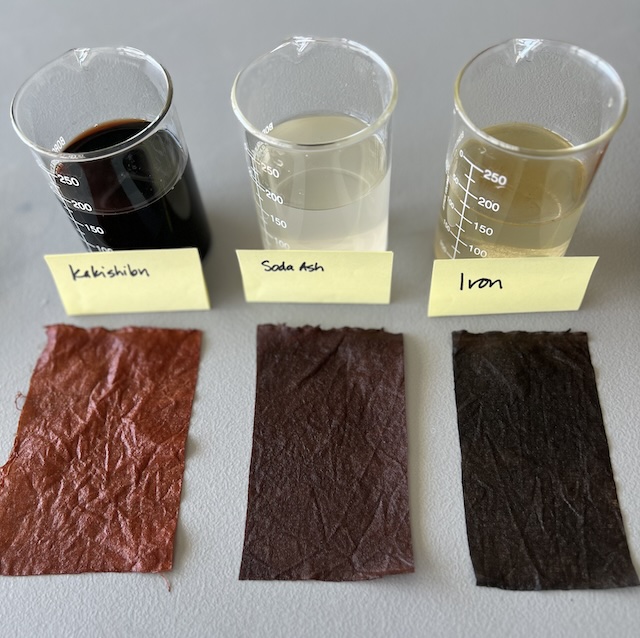
Kakishibu samples clockwise from top: paste resist by Kentaro Kojima, silk, cotton sashiko thread, cotton with iron, soda ash and kakishibu alone.
Natural dyes are fascinating because we can see the history of human curiosity and imagination as it interacts with the natural world. Like, who looked at a hard, green, horribly astringent, inedible persimmon fruit and thought “You know, there’s probably an amazing, insect-repelling, anti-microbial, water-resistant, beautiful color in there if I just ferment it for a couple of years with a slice of eggplant.” Who, exactly?
Whoever that clever person was, we have them to thank for one of my latest obsessions, which is kakishibu. Kakishibu literally means kaki = persimmon and shibu = astringent. So, astringent persimmon, which is a very accurate description of this ingredient that is made from fermented persimmon juice. The green persimmons are full of tannin and yield a very rich brown to dark gray that darkens with repeated dips, exposure to the sun, and with pH and iron shifting. Since it is such a strong tannin, it does not need a mordant. We have not used it in our tannin gradation experiments – yet.
Kakishibu is made when the fruit is developed, but still quite hard and green. According to Takayuki Ishii of Awonoyoh, the persimmons are ground, then pressed. The pressed juice is loosely covered and allowed to ferment for 1-3 years. Once the liquid has fermented, it is ready to use. Takayuki says that a slice of eggplant prevents the juice from coagulating into a jelly and is discarded once fermentation is complete.
Kakishibu is considered precious and the dye liquid is saved to be used again and again until the dye bath is depleted. It is through multiple dips and exposure to the sun that the deep brown color develops. Kakishibu uses a room temperature dye bath, so it’s easy to dip small pieces multiple times and let them develop. Exposure to sunlight changes the color to a darker brown, and overdyeing with iron or indigo creates additional shades. Do note that kakishibu also acts as a protective and strengthening coating, so the fabric will have body and crispness.
Kakishibu is also used with paper and wood, acting to strengthen, waterproof and protect these surfaces. The deep brown of katazome stencils is handmade mulberry paper that coated with kakishibu and smoked or cured. Curing takes another two years or so. You will sometimes see it advertised as a paint and wood sealer, as an ingredient in a deodorant soap, a hangover cure, in candy, and other traditional medicines.
Skill level: Good for an adventurous beginner or intermediate dyer. You should be familiar using iron and soda ash as a post-bath.
The inspiration for this post comes from some samples created during Awonoyoh’s Kakishibu workshop in Seattle in 2023. They achieved great effect with shibori, kakishibu, soda ash and iron. See the Notes below for using kakishibu powder.
Kakishibu – the basic sequence

Pictured here is a piece of Malian finimugu that has been partially dipped in kakishibu for one dip and is still damp. It gets darker and richer with each dip and exposure to sunlight.
We are now selling a liquid kakishibu and have been pleased with the results. This is a full strength solution that can be used straight from the bottle, or diluted with room temperature water. You can create a kakishibu bath by diluting the liquid. We used 50% kakishibu liquid and 50% water. You can also dilute it to your preference, using ratios like 25% kakishibu liquid and 75% water. We like the 50/50 blend. A more diluted solution will create a lighter shade, even with multiple dips. The container that you use for kakishibu can be quite small. I did all the experiments using about 100ml of liquid kakishibu and 100ml of water. This is approximately 7 ounces of liquid – less than a cup. We did all of our experiments in a 1 liter sized container (approx. 1 quart). See the Notes below for using kakishibu powder.
To get started, try making a kakishibu sampler with one dyed sample, one pH shifted sample and one iron sample, prepare 3 small pieces of fabric. We used cotton, but linen, hemp or silk would also work well. Instructions for cotton are below. If you are using commercially available silk, you probably do not need to scour the fibers.
Scour cotton fabric, using our scour recipe. Rinse well.
Taking one piece of fabric at a time, carefully dip and wring excess dye back into the kakishibu container. Hang to dry out of direct sunlight. The dips are short – probably about a minute each – and you can dip as many times as you wish, but you get the best color development if you allow the kakishibu piece to dry and expose the fabric to sunlight between dips. I did this by hanging the swatches in the sun to develop the characteristic brown color. The dipping and sunning process can take a few hours or much longer, depending on the strength of sunlight in your area. When you’ve reached the color that you like, save one as the base kakishibu color.
Shifting Kakishibu Color with Soda Ash

Pictured here are from left to right: Kakishibu in a medium shade, then dipped in a soda ash solution.
I dipped the second kakishibu swatch and changed the color using a pH shift from red-brown to a rich dark brown. This was an easy and dramatic process. I used a teaspoon (approx. 5 grams) of soda ash and dissolved it in 200 ml (7 ounces) of lukewarm water. Then I took my second kakishibu swatch, dampened it with water, and put it into the soda ash solution. It only took about 30 seconds for the color to start changing. I kept it in the soda ash for about a minute, then carefully removed it. Then I rinsed it well and let it dry.
Kakshibu and Iron Post-Dip

Kakishibu and Iron make a dramatic shift to a near-black gray with beautiful brown undertones. To make the iron solution, dissolve half a teaspoon (approx. 3 grams) of iron powder into about 250 ml (9 ounces) of room temperature water. Using tongs or gloves (to avoid iron-stained fingers), dip the third dampened kakishibu sample into the iron solution. The color will change quickly. Keep it in the solution for about 2-3 minutes, moving it gently. Remove and rinse immediately, wiping up any drips to avoid inadvertent iron contamination. Let air dry.

The samples are kakishibu (4th dip), still wet, kakishibu in a soda ash bath for dark brown, and kakishibu in an iron bath for dark gray.
Notes:
- Kakishibu liquid is available here.
- Kakishibu inspirations from Instagram @yokoyamamasami
- How to use Kakishibu powder – we sold this product previously and some customers still have a stash of it.
- Directions Mix the powdered dye with a little hot water to hydrate, then add up to 1 liter of lukewarm water and stir well to dissolve. Shake before using and let sit for a few hours to overnight. If the mixture begins to thicken and turn gel-like, dilute it with very hot water and mix well. This usually happens with age (over a few years or more). You can scale this recipe by doubling or tripling it.
- Light shade – Use 25 grams of kakishibu powder to 1 liter of water.
- Medium shade – Use 50 grams of kakishibu powder to 1 liter of water.
- Dark shade – use 100 grams of kakishibu powder to 1 liter of water.
- You may use the kakishibu at the strength you mixed, or add more water to dilute it. Keep in mind that diluting it will lighten the color. Pour it into a small container. Dip damp fabric into the kakishibu bath for a few minutes, then carefully remove and allow the excess liquid to drip back into the kakishibu container. Squeeze gently to get out as much excess kakishibu liquid as possible. Hang in sunlight. If you want to achieve darker colors, return the fabric to the kakishibu bath and repeat. Make sure you dry the fabric before reimmersing and briefly dampen the fabric before redipping. You may store kakishibu in a tightly sealed bottle indefinitely.
